Bryce7
SS/Continuum Ship Building Tutorial By ZiGNoTZaG 2012.

This tutorial will hopefully help you along on your path to making some ships
and other various vehicles for Subspace/Continuum using bryce7. At the time of
this writing you can acquire Bryce7 for free from Daz3d. All you have to do is
register to download it. While Bryce is a boolean editor and not intended to
create complex 3d models, it is capable of doing just fine. What's more, its
fairly easy to understand and use. The first section contains some various tips
for the actual construction of your ships. The second part explains the 2
template files and how to use them. please understand that this file is not to
help you understand Bryce itself, i would advise that you need to play around
with it and make sure understand the basics before attempting to make some
ships. I used bryce3, 4, and 7 to make all my ships, so some of things here MAY
be different in newer versions of Bryce, but I doubt it.
And don't mind my horrid grammar and spelling. :)
Part 1: Tips for making your ships.
You can either make your own file to build the ship in, or make a copy of one of
the template files and use it. The template files already have the camera setup
and sun setup so that the final product will have the highlights occurring on
the upper left corner of the ship (Like the VIE ships). You could change the sun
properties to suit your needs. Make sure to keep a copy of the original template
animation files around.
Make sure to double check that your Materials are applied in object space (a few
of the other modes will work fine too..hmm, parametric, parametric
scaled...others). This will make your materials move with the object, as opposed
to World Space which makes your textures absolute and your ship moves "through"
the texture. Much like your ship was made of glass, and the texture is under it.
Its hard to notice unless you know what your looking for. more likely then not,
you would render your ships and then find out it isn't right, even tho it looked
fine during the render. so... ya... check that before you render :) it can be
found in the material dialog, in each material component window at the bottom
right. Basically, avoid World Space in cases.
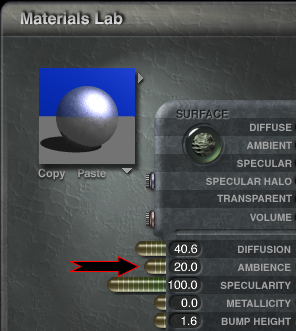
Click the M next to a Object to open the Material Dialog.

Give all your Materials an Ambiance value of at least 20 or greater. There is
room for experimentation here of course, you can get away with lower numbers
depending on the material itself. basically, the less ambiance the better. not
many things in real life have ambiance, so the more you have, the less realistic
your ships will look. Ambient light is light that your object will give off all
the time. the whole reason for any ambiance at all is that it will prevent your
Ship from having any see through spots, which is quite important. I think even
the vie ones have some holes in em' (ghetto). Also in a competitive game like
subspace, it can be disorienting to a player if too much of the ship becomes
shadowed when rolled.
Setting the Ambiance Value.
For a better looking canopy, position an infinite plane, with a cloud texture
above your camera (there is one in the full animation template, you could delete
it if you would like). then use one of the chrome like metal materials on your
canopy (make sure to give the canopy an ambiance value of 25 or greater).
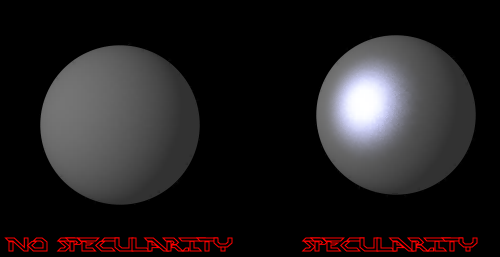
Specularity is also a nice attribute to crank up a bit. Specularity gives you
the highlights when the angle of the material reflects the light at the camera.
This gives objects a "shiny" look.
Don't worry about negative objects that make your ship center uneven. do
whatever it takes to make your ship cool. that problem can be solved once your
ship is complete, and you are ready to animate. I will show an example of this
later.
If things start to get funky for some reason, and the animation is looking
strange or your ship is resizing or something like that. A) Start over from
scratch and make sure to follow the all the steps. B) if that's not really a
great choice you can try and fix things by moving to the first frame off the
animation. Make things proper. Regroup your ship as one (if it isn't, cuss you
ungrouped it to fix it) and then click and hold the add key frame button and a
menu will appear. You can then choose which parts of the timeline to apply the
transformations to the objects. Best case is to select camera - all. Then your
object (ship) - all. that might get you out of a bind.
Avoid using textures that are very detailed, unless of course you plan or
rendering a ship bigger than the default 36x36. I would suggest doing some test
animations with the basic flat template to see if the texture is going to remain
steady at your chosen render resolution.
Build your ship in a large resolution setup, but every now and then make sure to
switch to your final resolution size and test a render to make sure its looking
ok. Don't think that you will simply build a set of ships, render them and all
will be well. Plan on doing at least a second pass with each ship. Sometimes the
most awesome looking ships in a larger sized resolution, turn out crap when you
reduce them to 36x36. Changes will have to be made, count on it.
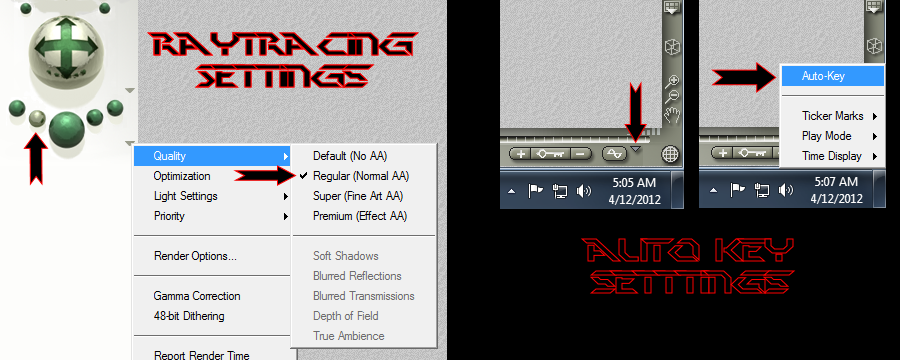
While building/test rendering your ship at the large size, I would suggest that
you set the Anti-aliasing level to normal and that you use fast preview render
mode.
When you switch to the small actual final size, make sure to set anti-alias High
(Premium) and turn off fast preview.
Make sure that Auto-Key is Off. This can be found by clicking the down arrow to
the right of the timeline button. Bottom of screen. Auto-Key automatically sets
points on the time-line when you move objects. In this case you do not want it
doing that. It will become fubar.
Part 2: The animation process using the full animation.
Ok here we go!!
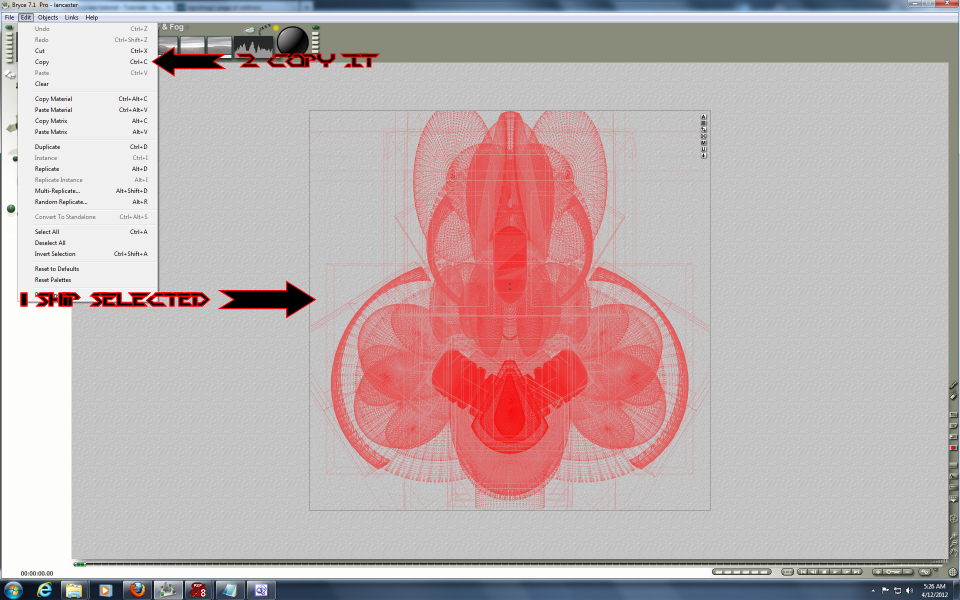
1: Open the Bryce file with your ship inside.
Make sure you have it grouped as one object. Make sure the camera is NOT
included. Make sure its oriented nose up, while looking at it from perspective
camera view. (nose pointed at top of screen, assuming you started building your
ship oriented with the triangle included in the templates) when you copy it.

2: Select your ship and make a copy of it, either by using the Edit menu's
Copy or hitting Ctrl-C.
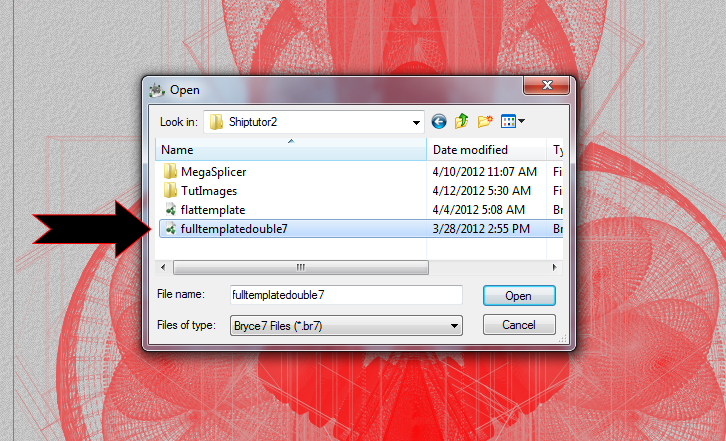
3: Open the template file.
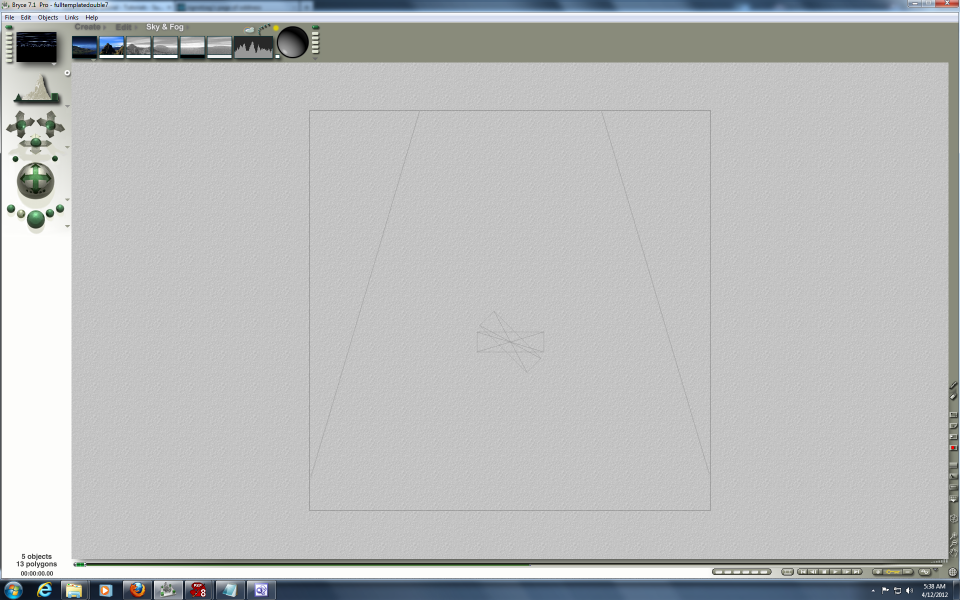
What you see here is a fresh template file. The triangles you see there are the
objects that have all the animations applied to them. These will be the "Parent
Objects" of our ships. They are hidden from the camera, but not locked. Don't
move them, group them together or with anything else, or interact with them in
any way.
Paste your ship in by using the Edit menu again, or hitting Ctrl-V.
NOTE: If you used some custom imported texture based materials and they are not
loading correctly when you paste the ship into the template, save the ship as a
preset object in the Bryce create dialog and then create your ship in the
template using the dialog. With your ship grouped as one object, 1:Click the
arrow next to create. 2: Add it to the object library. (I suggest you create a
new object category for ships, seen here as "User" You can do so by clicking the
+ below the category listing)

Once your ship is pasted in you should immediately save the project to another
location.
4: Roughly move your ship to the center of the perspective camera (if you
started building in the template it will be close already), at the level of the
triangle.(move it so its basically centered and the same distance away from the
camera as the triangle)

Switch to the non-perspective top-down view and center your ship under the
perspective camera which you can now see in view. Don't move the camera. If you
do by mistake, undo it.

Also make sure that your ship is oriented in the same fashion as the triangle.
i.e. the nose of your ship should be pointed towards the top of the screen when
you are in perspective camera view looking down on it. NOTE: again, it should be
this way when you paste it in assuming you started building in a template and
oriented it to the arrows to begin with. So if it isn't, rotate it now. When all
is said and done you should see something like the following when in perspective
camera view.

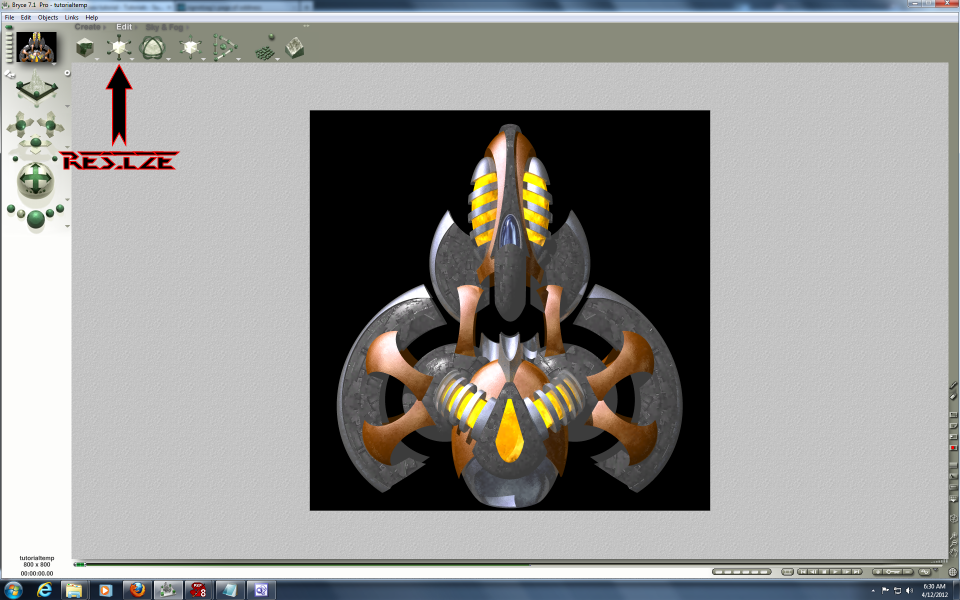
5: You will now need to most likely do some resizing of your ship to make it
fit in the rendering window. Switch the view mode to the perspective camera
mode by clicking the image right under the render preview window until you see
the little icon that looks like a camera. Move and or re-size your ship until
its as centered as you can get it, and so all its edges are within the borders
of the MAIN render window. Do not take into account negative objects while you
do this, ONLY the visible parts of the ship. This does not have to be perfect.
but as close as humanly possible. I would suggest using the Bryce EDIT menu and
the re-size tool (by clicking on the square in the center of the re-size tool
and dragging the mouse you can re-size the ship in proportion) to do this to
avoid distorting your ship, but you may have to distort its shape a tad bit when
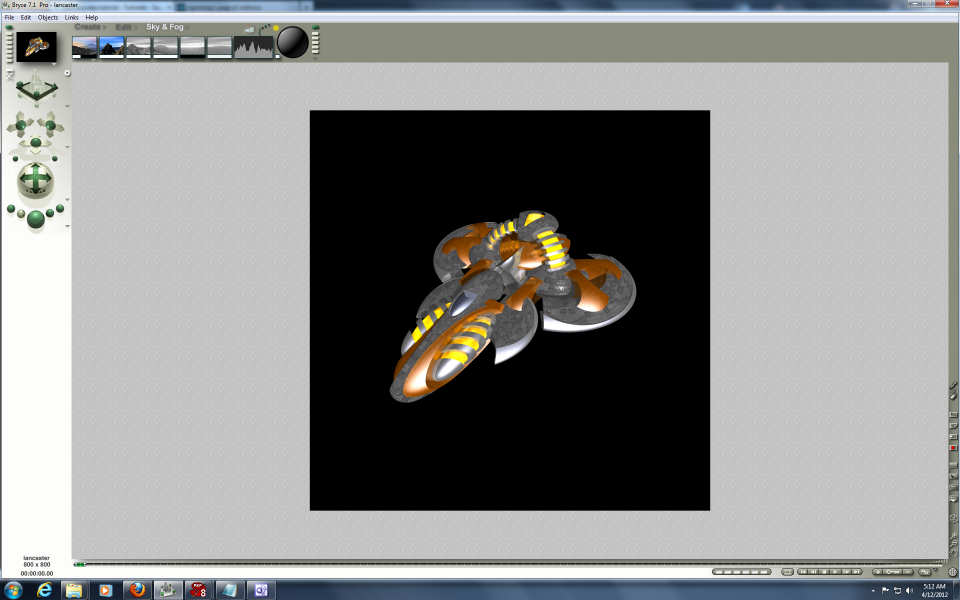
all is said and done. The ship pictured is fine at the moment so nothing needs
to be done yet.
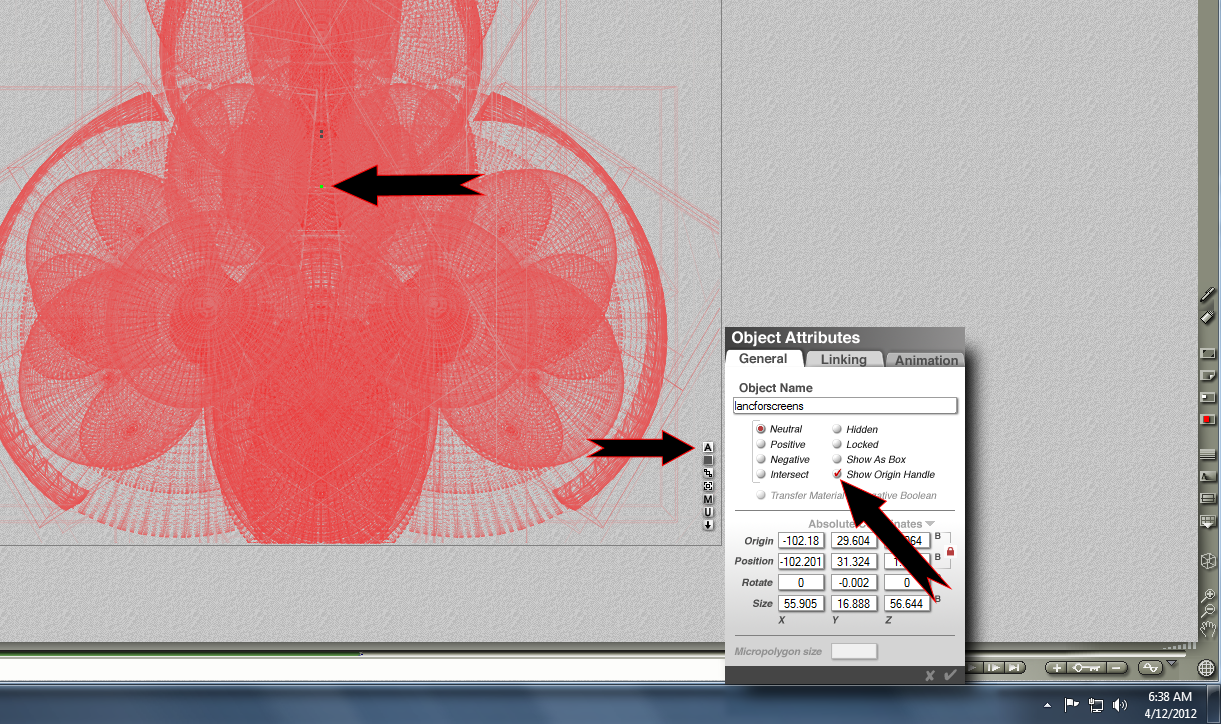
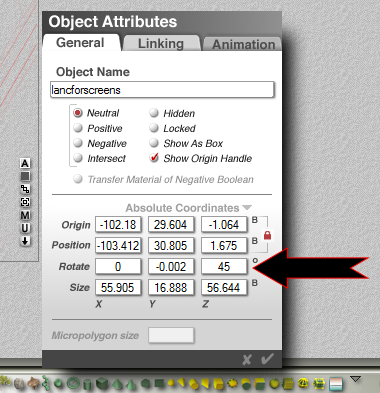
6: With your ship still selected view its Attributes by clicking the "A". and
put a check in "Show Origin Handle". this will display a green dot that
describes the center of your ship. Switch to Top down view. Grab your origin
handle and (click and drag) move it to the very center of the camera which will
be visible as a blue triangle wireframe. I suggest starting zoomed out some and
zoom in closer so you can get the origin handle as close to the center of the
camera as possible. Be careful not to grab the camera handle. Don't forget to
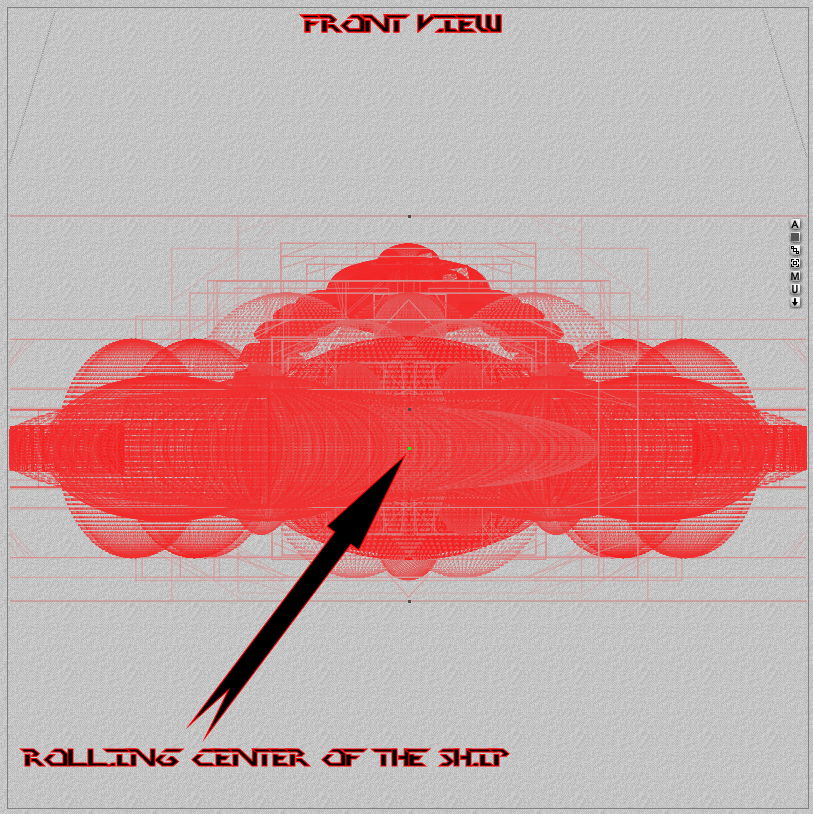
also check the rotation origin on both the horizontal and vertical axis. You
want it to not only be aligned to the center of the camera from the top, but
also at your ships center of mass. You want the ship to "roll" around its
center.

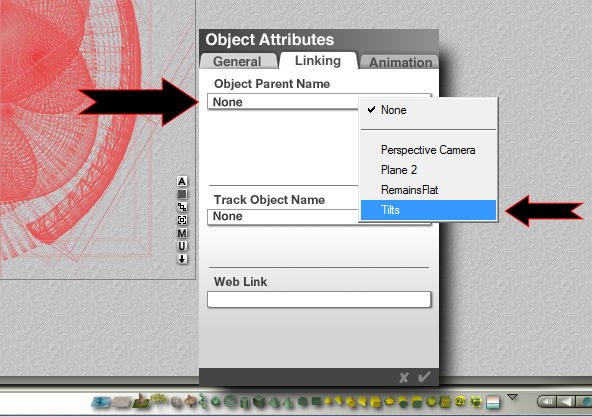
7:Now we need to attach the ship to the triangle which has all the animation
applied to it. Select your ship. Open the attributes. Click the linking tab.
Click the object parent name combo box, then find and select One of the
triangles. These are named. RemainsFlat (No rolls) or Tilts (Rolls). Tilts is
the most common one for use with most ships. RemainsFlat is there if you have
elements of your ship you wish not to roll. Like lets say you want the main
fuselage of the ship to remain flat while only the wings tilt. After choosing
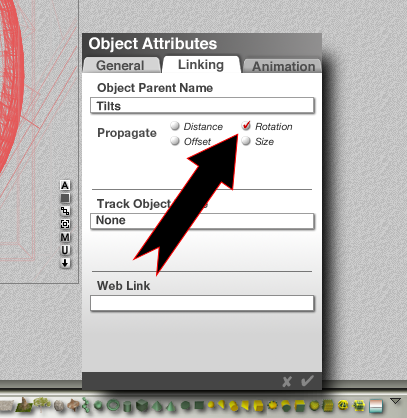
one it is IMPORTANT to UNCHECK all the propagate options EXCEPT ROTATION.
8: Since the animation starts rendering with ship already tiled 45 degrees to
the left. the final step before you render is to rotate your ship 45 degrees,
you guessed it, to the left.
Heres how: You should still be in the object attributes menu from the last step.
Click over to the general tab. In the rotate row, in the z column, enter 45.
Click the check mark to apply your changes and close the dialog. Recheck the
Origin handle at this point and center it only on the horizontal axis if needed.
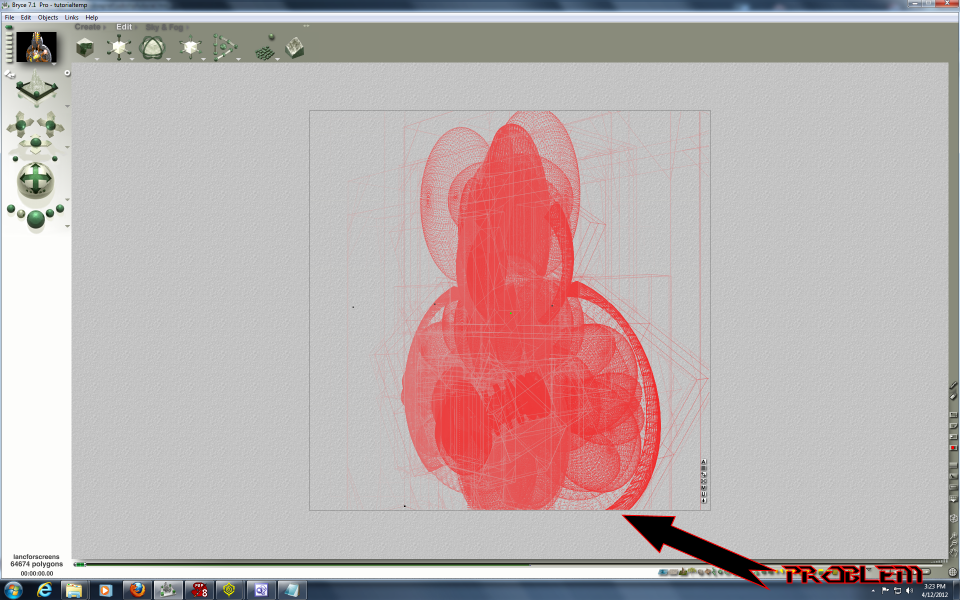
Your ship is now almost ready to render. But we have a problem now. You can see
that although things were fine when then ship was flat, now that we tilted it 45
degrees its clipping the edge of the render window. Lets fix it that in the nest
section.
9:Some final tests before committing to a render.
As your ship rotates and tilts. some parts of it may go outside the edge of the
render frame.
Better to see if it will now than finding out after the render.
We now need to switch to the animation VCR controls. if you are not already
looking at em' that is. There is a small wireframe globe at the bottom right of
the screen. Click it until the controls at the bottom of the screen look like a
VCR control and a slider bar, versus a bunch of squares and spheres and things.
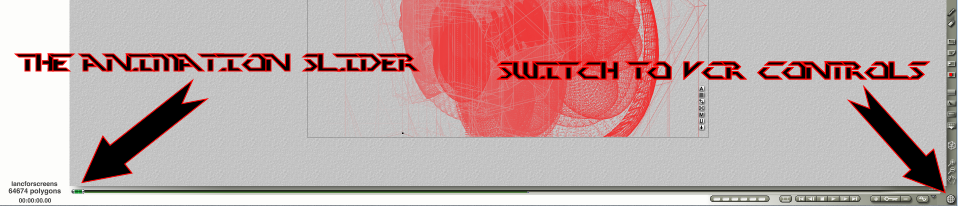
Since we have a problem right from the
start here we are going to need to resize the ship so that when it is tilted it
is still completely in the frame. The best and least confusing way to do so now
is to drag the slider until the ship is back in the original flat position it
was in before you entered the 45 degree adjustment into the attributes dialog.
This will be roughly at the middle of the animation. (The green portion you see
at the bottom of the screen in the previous image) Anywhere as long as the ship
is flat and and not rotated.
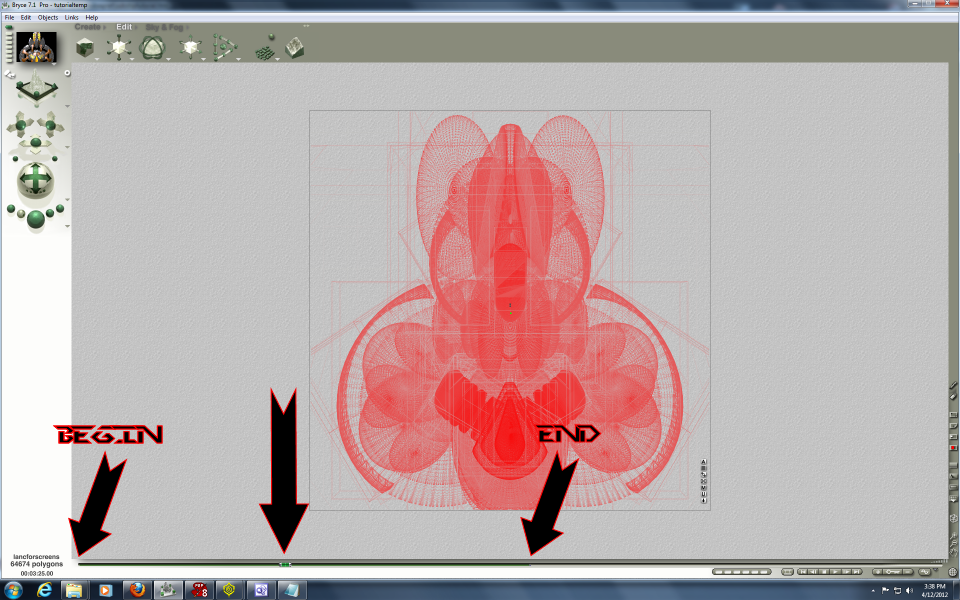
Right now the problem is that for this
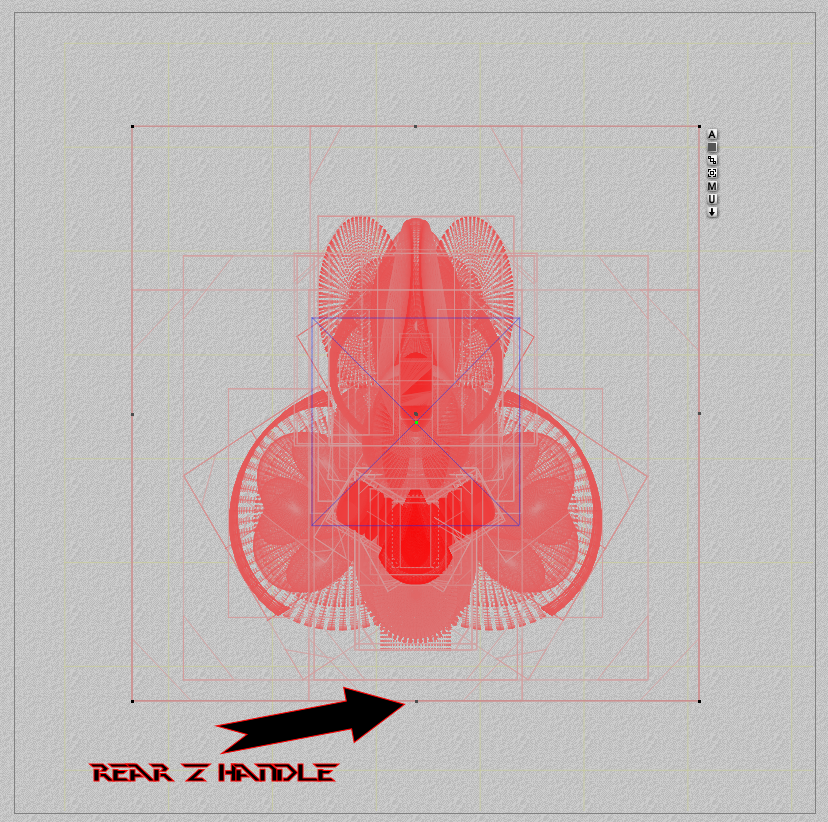
ship the rear is too close to end of the render window. Switch to Top Down view.
Make sure the editor is set to make the changes in Object Space.

Zoom out some using the - key. So we can
see the resize handles of the ship object. We have a few ways to approach fixing
this. We can just grab the rear handle and squish the ship a little further up
or ideally make the whole ship a little smaller to avoid distorting it too much.
Which can be done with resize tool we used earlier. Before you even think about
touching the VCR controls after making any sort of adjustment to the ships
dimensions RECHECK THE GREEN ORIGIN HANDLE AND MOVE IT BACK TO THE CENTER OF THE
CAMERA.
Once you have made some adjustments, drag
the slider around and watch for more possible problem spots. Even after reducing
the ship size I still had some trouble spots. Trouble spots are usually when the ship is around 27 degrees tilt.
Because this is a perspective render, the ships wings will get closer to edge of
the screen before they get farther away. i.e. as they get closer to the camera
they get larger. Its not much, but sometimes enough to start clipping your
wings!! If it is clipping... lets fix it now!
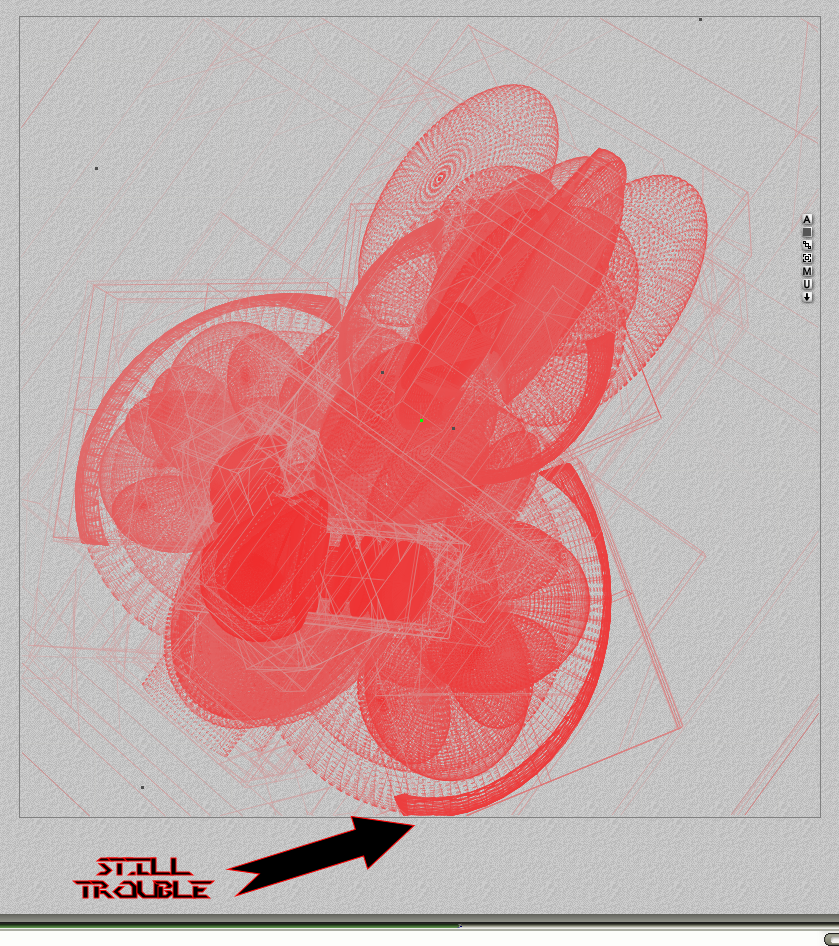
Its best (but not imperative as seen earlier) to return to the first frame (using the VCR
controls), un-rotate (roll/tilt) the ship using the object attributes menu again.
Anyway, make necessary changes, recheck the origin handle noted in step 6. Then start
again at step 8. In this case I did not want to reduce the width of the ship any
further so I first moved the ship back to a flat and unrotated position, then
grabbed the rear Z handle and squished the ship a little in the Z plane. Then I
recheck and adjust the origin handle.

NOTE: If you do need to make a quick change, you can do so at really any point
in the animation, just make sure you are making your changes in Object Space,
Not world space. If you make changes to the ships dimensions when its tilted and
the editor is set to make the changes in world space it will "skew" the ship.
FUBAR.
10:Lets render that bad boy.
Make sure you are at the very first frame of the animation by clicking the VCR
control all the way on the left. make sure Fast preview render is OFF. The
render control are on the right of the Bryce window and look like a bunch of
spheres. the Fast Preview mode is the circle just to the LEFT of the main render
button (sphere).
Click the down arrow to the right of the render controls and make sure you have
the anti-aliasing set to Premium AA. All this was noted earlier.
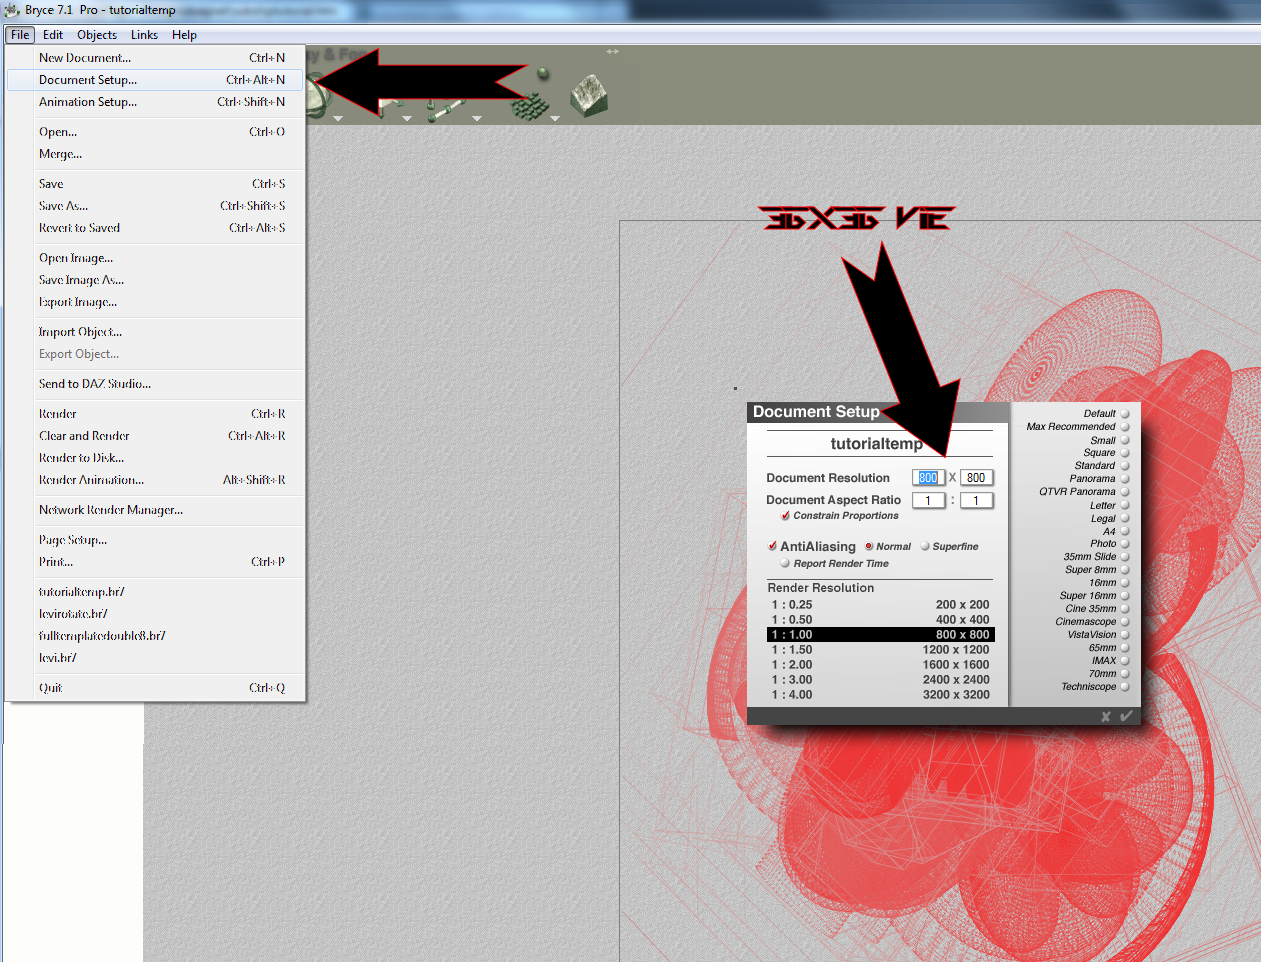
Make sure your set at the resolution of the final render.
Click the file menu again and choose "Render animation". From the dialog choose to
output the animation as a "series of bitmaps". and choose a folder that you want
all the frames to go to as Bryce creates them.

Click the check mark at the bottom right. Bryces Raytracer proceeds to do
amazing things.
Now sit back and smoke a bowl, drink a beer, pick your nose, masturbate, or
whatever it is you do, and watch your ship render. You will this first time, I
would
bet money :) Modern computers make quick work of rendering anything at this
small resolution. At premium AA 5-10 mins, depending on your computer and ship.
Final prep and notes:
Some of the frames created in the animation are not needed in the final ship.
These are transition frames where the ship is moving from one angle of tilt to
another and are again..not needed. The included MegaSplicer utility takes this
into account and skips them. If you dont want to use the utility and have some
other method, make note that the following frames should not be included in a
final compiled set of frames of your ship.
40,81,122,163,204,245,286,327,368,409,450(Considering your frame count started
with frame 0). That should leave 440 frames, which is all the frames needed for
the ship. 40 for each degree of rotation left and right, and 40 for the flat
ship. Again you don't need to do anything with them if you are using MegaSplicer.
NOTE: a ships degrees of rolls are left 45, 36, 27, 18, 9 , flat, right 9, 18,
27, 36, 45
The first 200 frames are the ship rotation left, these go at the top of the roll
file. Considering that your first frame started with #0 this will be 0-203.
The next 40 frames are the ship flat, these go into there own file. Frames
205-244.
The last 200 frames are the ship rotation right, these go after the first 200
frames. Frames 246-449 :)
The frames need to be tiled 10 per row. in consecutive order from left to right,
top to bottom.
Manually assembling the frames would TAKE forever and lead to insanity, so don't,
use MegaSplicer. It will do it in less than a second. The only manual assembly
that will need to be done is taking all the flat files and assembling them into
one large image. Easily done with any sort of slightly advanced Paint program. I
advise setting up a 36x36 grid and enabling snap-to-grid to make placement more
precise and easy.
NOTES ABOUT MEGASPLICER: Included in the zip with this text file you will find a
folder called MegaSplicer. Extract that badboy to somewhere. Inside is a small
proggie called...MegaSplicer. Run it (XP SP3 compatibility mode) and point it at
the folder that contains the bmp output from Bryce. Click Draw. Bam! Click save.
Choose a new location to save the assembled frames to. It will prompt you twice,
once for the flat, then again for the rolls. Just note that the output from
Bryce needs to be alone in a folder for it to work.
NOTE: the steps for making a flat only ship are the same, only you do not need
to tilt the ship before you render. and you will most likely only need to delete
one frame: 40. just make sure you only have the first 40 files in your completed
bitmap :) You can use my DIT utility to assemble a flat ship. You should be able
to locate that as SSDL's.
Have fun, and try to drop me a line when you have some ships made, ide like to
check em out. Take you time and make something awesome.
I will also be happy to help you out if you are having problems understanding
these crappy instructions.
zignotzag@gmail.com
I've prolly forgotten alot of stuff to include here. Hopefully I didn't leave any
major steps out in the process, but email me if you think I did and ill amend
them to the text.